Proverbs 8:17
"I love those who love me; And those who diligently seek me will find me.

Wednesday, January 28, 2015

Mini Lunch Box Notes "Giveaway Alert"

Hi, today I'm sharing a quick and easy little project.

I came across this cute stamp set in the CTMH Seasonal Expressions Catalog. I know there are tons of little critters/cute monster stamps out there, but I just loved this one and for only $9.95, I had to get them!


Aren't they cute?!?! I made 3x3 notecards, perfect for those lunch box notes and even for Valentines mini cards. My son doesn't start school until fall, but when he saw me making these he asked me if they were for him, lol, so I definitely know the kids will love them. I glued some googly eyes on them to make them a bit more fun.

That's all for today, thanks for stopping by!

*GIVEAWAY ALERT* 
Visit TCP Blog and leave a comment to win Close To My Heart stamp set and goodies out of The Crafty Pickle prize bin. Winner will be chosen Monday,Feb. 2 2015! Good Luck!!! 


Supplies used:
CTMH Stamp Set- Love Ya Silly
CTMH Ink- Gypsy, Lagoon, Hollyhock, Black

Friday, January 16, 2015

Valentine Treats #1 (My First Giveaway)

Hi and thanks for stopping by!

With Valentine's Day coming up, I thought that it would be a great idea to get a head start and share with you some fun and inexpensive treat gift ideas. I'm turning this into a mini series, so stay tuned for some fun and cute ideas!

Here is my creation...


I cut these adorable pillow boxes using the CTMH Art Philosophy Cartridge out of transparency sheets (image on pg 28) at 5 inches. I scored all the areas that needed to be scored and placed scor tape to close my box. I also used the CTMH Artiste and CTMH Artbooking Cartridges to cut my labels. I used the coordinating stamp set that came with the Artbooking collection for the base of my labels and Holiday Tags Occasions stamp set for the center and sentiments.

Finally, I filled them up with Hershey Chocolate Kisses and wrapped then tied some ribbon to secure the pillow box closed. I used a glue dot to place my labels on the treats, finishing them off with some bling.

I hope you enjoyed today's post and as I stated, I'm having my first giveaway! I'm super stoked with having a little over 40 likes on my FB page, so thank you to everyone that has liked my page and to those special crafters who follow me on my blog! I am giving away 6 of these awesome pillow box treats, more details below.


**To enter into the giveaway please be a follower of my blog and/or facebook page and comment here to let me know you follow. You will get an additional entry if you are a follower of both my blog and FB Page and a 3rd one if you invited friends to check out my page and like it. I will choose the winner on Monday! Good luck and thanks again!**

Supplies used

Wednesday, January 14, 2015

Crafty Goodies

Hi, crafty friends! I just wanted to stop by and let you know about a few things.

In case you missed it yesterday, The Crafty Pickle etsy shop was stocked with some awesome new sequins! Here is a look at the new sequins!


Aren't they stunning!?!?!? I absolutely love them and can't wait to get my hands on them! Not only is there sequins stunning, but their flair is absolutely wonderful! There are tons of great designs and custom orders are also available! And their packaging, oh my, even includes some sequins. Here's a look at how they'll come when you place your order...just plain gorgeous!


The last thing that I would like to share is that I recently created a facebook page for my blog, I would love for you to be a follower there and also here :) Stay tuned as I'm working on a few Valentine's project that I should have up by the end of this week! 

Thanks for stopping by, I truly appreciate it!

Have a fabulous day!

Thursday, January 8, 2015

Happy Birthday Card

Hi! I'm so happy that you have stopped by!

Today I am sharing a birthday card with you...


As I mentioned in one of my previous post, I recently purchased the CTMH Artbooking Cricut collection and one of the many reasons was the overlay images.  I love stencils and modeling paste and thought that it would be fun to be able to create some of my own stencils and size them to whichever size I wanted.

Here is a look at how the image on page 53 turned out when I took some transparency and cut the image at 5 inches creating my own stencil...


I just placed my stencil on my card base and applied the modeling paste right on top. It was so easy and I was really happy with the results and the best thing is that I can reuse my stencil...woohoo! There are so many great images on this cartridge, I'm telling you, it's a must have.


I took some watercolor paper and used my cricut and the Artbooking cartridge to cut the circle swirl image from pg 55, the tag from pg 83, and the happy birthday image from pg 86.  I stamped a butterfly image using the CTMH Sweet Moments stamp set on my tag with some white embossing powder. I then used CTMH Inks Lagoon and Cotton Candy, to water color my images by adding some ink on a clear block and than taking some water and a brush to pick up the color and adding it to my images creating an ombre look.

To finish off my card I added a beautiful flair from the Family Themed Flair. These are so nice and could be used to personalize any card or project for your loved one.

Hope you enjoyed and thanks again for stopping by and as always don't forget to check out TCP Etsy shop to pick up some awesome flair. There are tons of great new items in the store!

                                                                      
                                                                      Supplies used:

Wednesday, December 31, 2014

"2015" Shaker Card

Hi and thanks for stopping by! I hope everyone is having fun getting ready for the new year! As for me and my little family, we plan to stay home where it will be cozy and safe, lol!

Today I am sharing with you a shaker card! I am totally in love with these types of cards, they are so fun to make and my family totally loves them.

Here it is:


I took the small images in the Lawn Fawn Snow Day and Avery Elle Cake & Candles Stamp Sets with some Gold Delicata Ink (this stuff is FABULOUS) to create my background. I tend to forget about those smaller images all the time and I'm glad I was able to put them to good stampin use, lol!

I then took some CTMH Black card stock and cut a 3 1/4 x 4 1/2 square and used the 3rd largest rectangle from the Lawn Fawn Large Stitched Rectangles Stackables to create the open area in the middle. Placed some clear transparency and added a few layers of Kool Tak Clear Foam Adhesive (great stuff when you are making a shaker card that includes black on black to help hide the adhesive) to the back. I die cut some MFT Die-namics Sequins from gold card stock, this die set is nice because it has larger sized sequins to help add variety and also you could customize your sequins to fit the colors for your projects when you don't have any on hand.

Finally, I took Lawn Fawn Finley's 123s and cut "2015" out of some more gold card stock to help match the sequins in my shaker.

Thanks for stopping by and I hope you enjoyed my card. Have a safe and Happy New Year!

Don't forget, today is the last day to get 30% off your entire purchase! Click here to go shopping!

Supplies used:
Gold Delicata Ink
Lawn Fawn Finley's 123s
Avery Elle Cake & Candles Stamp Sets
Lawn Fawn Large Stitched Rectangles Stackables

Wednesday, December 17, 2014

"Merry Christmas" Shaker Card

Hi! Today I am sharing a cool shaker card. But before I get started, have you check out the new and fabulous products in the TCP Etsy shop? If not, PLEASE stop by, there's some really great stuff!

I recently purchased the CTMH Artbooking Cricut Collection and let me tell you, I absolutely LOVE this cartridge! It's geared towards making mini-albums and layouts easier and faster, but you could totally use this awesome cartridge in so many ways.

So here is what I made...


I used some AC red foil specialty paper and cut an image that was meant for a mini-album page (Artbooking Handbook pg. 56) and made it into a shaker card! I used my gypsy to hide the ring holes (you could also use Cricut Craft Room) and sized it to where it would be a bit smaller than a standard A2 card. I took the "Merry Christmas" cut (from pg. 75) and used it as my sentiment for the front of my card.

As for my awesome sequins... did you know that when you place an order with TCP Etsy shop, it will come packaged with some fun sequins and what can you make with that awesome sequins you ask... A SHAKER CARD!!!

I hope you are leaving feeling inspired! It was super fun taking an image that was meant for something else and making it work in a whole new way.

Hope you enjoyed this card and as always, thanks for stopping by!

Supplies used:


Wednesday, December 10, 2014

Personalized Stationary

Hi crafty friends!

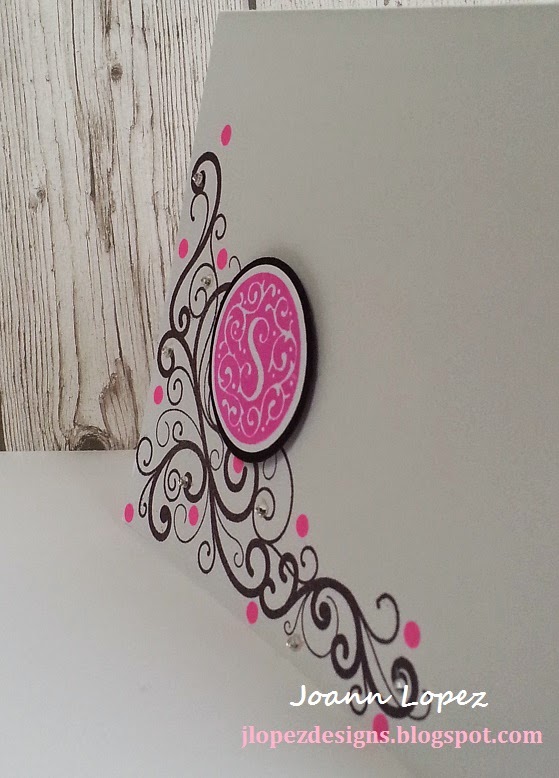
Today I wanted to share something I'm working on for some ladies that work with my mom. I'm creating some personalized stationary gifts that will have 5 note cards with 5 envelopes and place them inside a box. I haven't made the box yet, but I wanted to share with you the envelope with the note card.


I used CTMH The Best Things stamp set for my design and CTMH Monogram S stamp to personalize it. I backed it with cutting some black card stock with a 1 3/8 circle punch, added some dimensional adhesive and finished it off with adding a few dots and some rhinestones.


I then took my envelope and stamped the same image on the top left corner to match the note card. I didn't do much to it only because I wanted the note card to really show when it came out of the envelope.

CTMH has Monogram stamps from A-Z and they are only $2.95, so reasonable for such a pretty monogram that could be used for so many things and can easily be cut out with a 1 1/4 circle punch.

These were so easy and quick to make. Would make a lovely gift for a co-worker or even teachers! Hope you were inspired and thanks for stopping by!

Supplies used: