Proverbs 8:17
"I love those who love me; And those who diligently seek me will find me.

Wednesday, December 31, 2014

"2015" Shaker Card

Hi and thanks for stopping by! I hope everyone is having fun getting ready for the new year! As for me and my little family, we plan to stay home where it will be cozy and safe, lol!

Today I am sharing with you a shaker card! I am totally in love with these types of cards, they are so fun to make and my family totally loves them.

Here it is:


I took the small images in the Lawn Fawn Snow Day and Avery Elle Cake & Candles Stamp Sets with some Gold Delicata Ink (this stuff is FABULOUS) to create my background. I tend to forget about those smaller images all the time and I'm glad I was able to put them to good stampin use, lol!

I then took some CTMH Black card stock and cut a 3 1/4 x 4 1/2 square and used the 3rd largest rectangle from the Lawn Fawn Large Stitched Rectangles Stackables to create the open area in the middle. Placed some clear transparency and added a few layers of Kool Tak Clear Foam Adhesive (great stuff when you are making a shaker card that includes black on black to help hide the adhesive) to the back. I die cut some MFT Die-namics Sequins from gold card stock, this die set is nice because it has larger sized sequins to help add variety and also you could customize your sequins to fit the colors for your projects when you don't have any on hand.

Finally, I took Lawn Fawn Finley's 123s and cut "2015" out of some more gold card stock to help match the sequins in my shaker.

Thanks for stopping by and I hope you enjoyed my card. Have a safe and Happy New Year!

Don't forget, today is the last day to get 30% off your entire purchase! Click here to go shopping!

Supplies used:
Gold Delicata Ink
Lawn Fawn Finley's 123s
Avery Elle Cake & Candles Stamp Sets
Lawn Fawn Large Stitched Rectangles Stackables

Wednesday, December 17, 2014

"Merry Christmas" Shaker Card

Hi! Today I am sharing a cool shaker card. But before I get started, have you check out the new and fabulous products in the TCP Etsy shop? If not, PLEASE stop by, there's some really great stuff!

I recently purchased the CTMH Artbooking Cricut Collection and let me tell you, I absolutely LOVE this cartridge! It's geared towards making mini-albums and layouts easier and faster, but you could totally use this awesome cartridge in so many ways.

So here is what I made...


I used some AC red foil specialty paper and cut an image that was meant for a mini-album page (Artbooking Handbook pg. 56) and made it into a shaker card! I used my gypsy to hide the ring holes (you could also use Cricut Craft Room) and sized it to where it would be a bit smaller than a standard A2 card. I took the "Merry Christmas" cut (from pg. 75) and used it as my sentiment for the front of my card.

As for my awesome sequins... did you know that when you place an order with TCP Etsy shop, it will come packaged with some fun sequins and what can you make with that awesome sequins you ask... A SHAKER CARD!!!

I hope you are leaving feeling inspired! It was super fun taking an image that was meant for something else and making it work in a whole new way.

Hope you enjoyed this card and as always, thanks for stopping by!

Supplies used:


Wednesday, December 10, 2014

Personalized Stationary

Hi crafty friends!

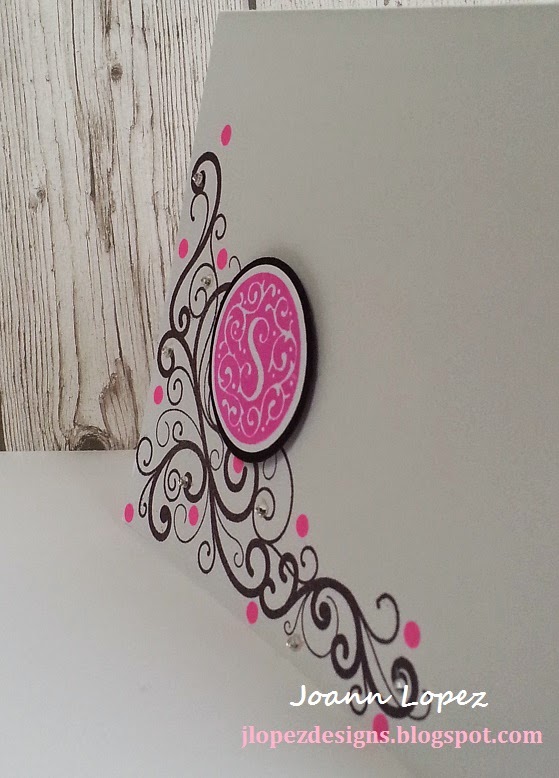
Today I wanted to share something I'm working on for some ladies that work with my mom. I'm creating some personalized stationary gifts that will have 5 note cards with 5 envelopes and place them inside a box. I haven't made the box yet, but I wanted to share with you the envelope with the note card.


I used CTMH The Best Things stamp set for my design and CTMH Monogram S stamp to personalize it. I backed it with cutting some black card stock with a 1 3/8 circle punch, added some dimensional adhesive and finished it off with adding a few dots and some rhinestones.


I then took my envelope and stamped the same image on the top left corner to match the note card. I didn't do much to it only because I wanted the note card to really show when it came out of the envelope.

CTMH has Monogram stamps from A-Z and they are only $2.95, so reasonable for such a pretty monogram that could be used for so many things and can easily be cut out with a 1 1/4 circle punch.

These were so easy and quick to make. Would make a lovely gift for a co-worker or even teachers! Hope you were inspired and thanks for stopping by!

Supplies used:

Tuesday, December 9, 2014

CTMH Rolling Tote

Hi there!

Wanted to stop by and let you know about an AWESOME promo Taniesa has for you if you purchase a CTMH rolling Tote. Head on over to TCP Blog for more details!


See you tomorrow for a fun little post!

Have a fabulous day!

Monday, December 8, 2014

The Crafty Pickle Etsy Shop

Hi, crafty friends thanks for stopping by!

Wanted to share that The Crafty Pickle Etsy shop is up! 


Also, were you aware that if you were looking for personalized flair, Taniesa can make them for you. You might be wanting some flair with your child's name or your family last name to put on your family album cover (just a few ideas). Just head over to the etsy shop and send Taniesa a message.

Click on the links below to view some examples:

Elf on the Shelf
Personalize it with a name

Thanks again for stopping by!

Wednesday, December 3, 2014

Candy Bar Treat Holder

Hi! Today I have fun little project to share with you today and my first ever step by step tutorial (so this is a warning that it is a LONG post, lol)!

I wanted to create some fun treat holders to give to a few friends and family some in which I could fit a snicker bar. I searched for a few ideas and came across many (pinterest of course, lol) and most of them used the envelope punch board, but I wanted to be able to make one without the punch board.

Here is what I came up with...


I started off with cutting some 12 x 12 Cranberry card stock from CTMH at 9 1/4 x 5 (you can get 2 treat holders out of a 12 x 12). I then placed my card stock long ways on my scoreboard (9 1/4) and scored it at 1 1/8, 2 1/8, 7, 8. I then took my card stock and rotated it (5) and scored at 3/4, 1 7/8, 3 1/8, 4 1/8.  It will look like this...


Taking my scissors I started to cut (black lines indicate where you need to cut and the "x" indicates the areas that will be removed).

You will then be left with this (I marked the 4 areas with stars for the next step below)...


The 4 squares with the stars (shown above) will need a small diagonal cut off of 2 sides (picture on the left). After all four squares have been cut, your treat holder should look like the picture on the right. This will help with the closure of the box.


I used my grid mat to place small dots on the top and bottom squares of my treat box (picture on the right). I took my scissors and meet the side dots to the top. You should end up with the picture on the left.
I took CTMH stamp set Snowflakes to stamp a few images for my box and turned the box on its back and placed some strong adhesive on the 3/4 side (one of the sides is slightly smaller than the other, I did it this way so when the box is closed, the closing on the back is down the middle and not to one side).


I found the easiest way to line everything up was to fold the box and carefully push down so both sides stick to the adhesive and then I opened it to run my finger inside, making sure it was secured.


I cut an image from the CTMH Artiste that coordinates with the Holiday Tags CTMH stamp set and stamped it with some Cranberry Ink and placed a TCP December Flair in the center (the glitter on this flair is stunning). Punched a hole on top and ran both ends through it so I could tie a nice bow on top of the tag.


I know this was a lengthy post but once you get one done, I promise the others will be super fast. I appreciate you making it to the end and I hope you enjoyed my first tutorial.

Just a heads up...
The Crafty Pickle is in the process of opening a new shop so please stay tuned for more info or follow on facebook The Crafty Pickle.

The Crafty Pickle etsy shop is back open!

Thanks for stopping by.

Supplies used:

Monday, December 1, 2014

Cyber Monday Sales

Hi, I wanted to share some awesome crafty Cyber Monday deals with you!


The Crafty Pickle etsy shop:


This next one is OMG AWESOME! CTMH sale on all Cricut Cartridge Bundles! I personally own 2 out of the 4 and I love them and with this sale, it looks like I'll be adding another one to my collection! Click here to get yours!


Butterfly Reflections Ink


Thanks for stopping by!

Saturday, November 22, 2014

"Joy" Christmas Tag

Hi!

Join me over at Butterfly Reflections Ink blog for my post and the list of supplies that I used to create this beautiful tag!


Thanks for stopping by!

Tuesday, November 18, 2014

Thanksgiving Gift Idea

Hi crafty friends, so happy you have stopped by!

If you stopped by my blog a few days ago, I shared with you all that I participated in a couple of Christmas craft fairs! It was my first time, and let me tell you, it was an awesome experience. I met a lot of people and actually made a few friends!

So with that said, I am sharing with you my first The Crafty Pickle Design Team post! I had a few nugget tins left over from my fairs (8 to be exact, lol) and I thought that I could redesign them for a few Thanksgiving gifts for a few family members and friends!


I used both CTMH Cartridges (Artiste and Art Philosophy) to cut all of my leaves at 2 inches and used some watercolors to give them so color. I wrapped my nugget tin with some craft paper (cutting that at 2 inches) and tied some brown twine. I then glued all of my leaves down and added some TCP November Flair to the center where all of my leaves met and finished it off with some fabulous TCP Autumn Sequins Mix! Hope you enjoyed my gift idea!


Thanks for stopping by, and don't forget to stop by the The Crafty Pickle Etsy Shop for some awesome goodies!

Supplies used:
Watercolor Paper
Brown Twine
Watercolors

Monday, November 17, 2014

TCP Blog Hop


Welcome to The Crafty Pickle blog hop!

Today our creative team will be sharing with you ideas on using Flair, Sequins, Close To My Heart stamps, and more.

Make sure you leave a comment on each blog as you hop along for extra chances at winning some fabulous prizes. You have until Friday November 21st to comment and winners will be announced on Monday November 24th!

Prepare to be inspired by our awesome, creative crafty pickle team!

If you are coming from Elodie's Blog, then you are in the right place! If not click HERE to take you to the beginning of an awesome blog hop!

First off, thank you for joining us and we hope you are having fun! With Thanksgiving totally being next week I thought a card would be nice to share with you (there is still time to mail one, lol)!


I started by creating my own rosette simply by cutting a strip of CTMH Cranberry Cardstock at 2 1/2 inches and used a border punch to one side and scored between each scallop. I used the CTMH Cricut Artiste Cartridge to cut the middle design at 1 3/4 and stamped it with a matching CTMH stamp set "Holiday Tags" using CTMH Sunset Ink Pad and topped it off with some TCP November Flair. Using the same stamp set I stamped my sentiment with some CTMH Cocoa Ink.

I finished my card with some brown twine and added some beautiful TCP Autumn Sequins Mix


I hope you enjoyed my card!

Supplies Used:

Thanks for visiting. Next up on the blog hop is Julia!

If you get lost along the way here is the order of the hop.

Alicia http://www.sassycardsbyalicia.blogspot.com/
Carrie http://carrieshappyscrappin.blogspot.com/
Catherine http://catherinegmartin.blogspot.ca/
Elodie http://scrapydoo.canalblog.com/
Joann http://jlopezdesigns.blogspot.com/
Julia http://monjolibricolage.blogspot.ru/
Kristen http://memoriesbythepageful-kristin.blogspot.com/
Monika http://www.made-by-monalisa.blogspot.com/
Stephanie http://www.stephanie-eaken.blogspot.com/
Treasa http://www.popdotsandlollilops.blogspot.com/

And don’t forget to go back to The Crafty Pickle blog when you’re done and comment there too! 

That’s 11 chances to win!


Happy Hopping!

Wednesday, November 12, 2014

Birthday Gift Card Holder

Hi and thanks for stopping by! I've neglected my blog for a few weeks to prepare for my first craft fair! AHHH! It happened this passed weekend and I was nervous, excited, and ready! The turn out was nice and as crazy as it sounds I signed up for another one that will be happening this weekend!

Here's a look at my set up!


I also wanted to share another project that I submitted for the Design Team Call that The Crafty Pickle had a few months back. If you haven't visited TCP Etsy Shop, PLEEEESE do so, there are tons of great flair and sequins in stock!

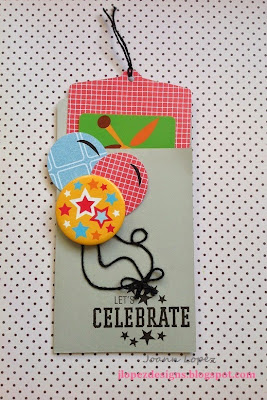
Here is the gift card holder I made...


I used CTMH Artiste Cricut Cartridge to cut my envelope and tag (pg 37 in the handbook) and the balloon (pg 70 in the handbook). As you can see in this project I used my flair as a balloon to add some fun to the envelope.

Hope you enjoyed it! Thanks for stopping by!

Supplies

Tuesday, November 11, 2014

"Hello Baby"

Hi! Today I wanted to share a card with you that I made for the Design Team Call that The Crafty Pickle had a few months ago!

To be honest it was a first for me to use flair, why...I have no idea, lol!


I altered the flair a little by adding the word "BABY" with some StazOn Ink. I used Close to My Heart Artiste Cartridge to cut the frame and stamped in the image with CTMH Perfect Fit- Frames 2 Flair! I did add a few sequins and some twine to finish off the card!

Thanks for stopping by! Come back tomorrow for another project!

Supplies Used

Wednesday, October 22, 2014

Exciting News


Hi crafty friends! I wanted to stop by and announce that I'm now apart of The Crafty Pickle Design Team!


Stay tuned as the DT has a lot of great ideas to share with you! As for now, feel free to visit The Crafty Pickle Facebook page, blog, and Etsy Store for some awesome flair and beautiful sequins!

Thanks for stopping by!

Wednesday, September 10, 2014

Butterfly Reflections Ink DT Post

Hi, join me over at Butterfly Reflections Ink Blog! I used the new Lawn Fawn Christmas stamp set! Hope you can check me out!

Here's a sneak peek...


Thanks for stopping by! Have a fabulous day!

Wednesday, September 3, 2014

Butterfly Reflections Ink Post

Hi, join me over at Butterfly Reflections Ink Blog to see the fun birthday card I created!

Here's a sneak peek...


Don't forget Butterfly Reflections Ink is having a DT Call, click here to see more details!

Thanks for stopping by!

Friday, August 15, 2014

"Happy Birthday" Distress Ink Fun

Hi, today I have a fun card I made using the distress inks from Tim Holtz. I am loving my stash and am having super fun creating with them.

First I white heat embossed my sentiment on my watercolor paper and after placing two different colors of distress inks on my craft mat and spraying it with water I then placed my watercolor paper right on top and pressed down. I picked up my paper and moved it around to help the colors move on the paper. I really love the look and the way my card turned out. I am definitely going to make another card like this one...lol!

Here is my card:


Thanks for stopping by!

For an awesome shopping online experience shop at Butterfly Reflections Ink.

Supplies used (links may have related items in case item is not stocked):


Thursday, August 14, 2014

Hi There

I wanted to stop by and let you know that Vanessa over at Butterfly Reflections Ink has some awesome new products in the store and that there's still time to get some great items that are at 20%, 30%, and 50% off plus free shipping on all orders $60.00 and over!


Today was my day to post on the Butterfly Reflections Ink Blog, so don't forget to stop by and check out my post!

Have a fabulous day!
Joann

Wednesday, July 9, 2014

Anniversary Card

Hi! Today I would like to share a special card that I made for my husband! On Monday, we celebrated 7 years of marriage, WOOHOO! I love him to pieces and couldn't have asked for a better person to share my life with, and with 7 years being "copper" I wanted to incorporate a little of that color in my card.

Here it is:


I did cut my light bulb 3 times, once out of white card stock and twice out of vellum. I embossed the white card stock with copper embossing powder and on one of the vellum pieces I cut the heart piece into the light bulb to be able to inlay that piece instead of it sitting on top. I used my Xyron sticker maker to glue both vellum light bulb pieces together. The Xyron works perfect because it doesn't show any adhesive. 

I placed glue behind the heart wire portion to place it on top of my embossed light bulb and added foam adhesive. I added some red glitter paper stripes to match my heart, followed by some enamel dots and my sentiment.

Hope you enjoyed my card and as always thanks for stopping by!

Supplies:
MFT Die-namics Lightbulb
Zing Copper Metallic Finish Embossing Powder
ZingRed Glitter Finish Embossing Powder
CTMH Black Ink

Thursday, July 3, 2014

Oh Happy Day

Happy Thursday! I wanted to start off today's post with an announcement! Vanessa over at Butterfly Reflections Ink had a Design Team call for her new store, I decided to apply and got news a few days later that I made her team...OMG was I excited! This is my first design team and I am super duper honored and I hope I make her proud!

She was super kind in sending me a few items from her store and I wanted to share a few of them with you on today's card! I wanted to create something in celebration of this happy day, a card to help someone celebrate a special moment or time in there life.

Here it is:


I decided to use a fun layered embellishment from Maggie Holmes, love love this collection, with some of the same paper I used on my last card (same collection). I added my sentiment using one of my favorite stamp sets Avery Elle Oh Happy Day! Such a beautiful stamp set, if you don't own this one you definitely need to pick it up here and add it to your stamp collection, you will not regret it! I then stamped some sequence using the MFT You Were Meant to Sparkle stamp set on vellum (another great stamp set), placed some adhesive behind my embossed images to place my vellum on top of my design paper. I just love how the vellum softens the busy background.

Well there is my finish card, hope you enjoyed it and as always thanks for stopping by!

Don't forget to stop by the store, you still have a chance to get 20% off your entire purchase. Sale ends on Sunday July 6.

Supplies

Monday, June 30, 2014

Butterfly Reflections Ink-20% off entire store


Hi! Just wanted to stop by and share that Vanessa over at Butterfly Reflections Ink has 20% off her entire store! She has some awesome products in her store, but please keep in mind she is on vacation and will ship your order when she returns on Monday, July 7, 2014. Go check her store out and shop, shop, shop!

Thanks for stopping by!

Thursday, June 26, 2014

Pin Inspired #3 "Thinking of You"

Hi! Today I have another pin inspired card. I've been in this "vintagie" (don't know if that's a real word, lol) with gold kinda mood. While going through my stash I found the Flea Market collection from Maggie Holmes and new right away it would be perfect.

My inspiration was a card sketch from one of my pins on Pinterest (view here).

Here it is:


I used a 1 inch circle punch to cut out my circles using different patterns from the collection. I also added a larger piece of vellum on top to give it a frosted look. I added my sentiment with gold embossing powder and some gold sequins to finish it off then popped the top layer with some foam adhesive and there's my finished card. Hope you enjoyed my card for today!

Thanks for stopping by!

For an awesome shopping online experience shop at Butterfly Reflections Ink.

Supplies used (links may have related items in case item is not stocked):
Stamp: Avery Elle-Laurels
Embossing Powders: Zing Gold Metallic Finish
1 inch circle punch
Vellum

Wednesday, June 18, 2014

"Hello" Card

Hi there! I wanted to share a card that I made using some distress inks. This passed weekend I purchased a few of Tim Holtz distress ink and played around with a few techniques that I've been wanting to try.

I started out by stamping my images on watercolor paper and after I had all of my images stamped I sprayed water as few times on my entire card. After it dried, I just added some letter stickers and a few sequence to finish off my card.

Here is my card:


I absolutely love how it turned out! I really love this easy and fun technique. Stay tuned for another distress ink card!

Thanks for stopping by!
 Supplies:
Stamp Sets: Avery Elle-Oh Happy Day, Laurels
Hobby Lobby: Watercolor Paper


Friday, June 13, 2014

Dad Card

Hi!

Happy Friday! Today's card is one I created for Father's Day! Masculine cards are very difficult for me only because I love embellishing my cards and adding glitter and when it comes to masculine cards I feel like I have to hold back, lol.

As I looked through my stamp sets I found this adorable mustache that reminded me of my dad! After cutting and stamping the image the card came together rather quickly.

Here it is:


Supplies:
CTMH Paper: For Always Collection
Thanks for stopping by!

Thursday, June 12, 2014

Pin Inspired #2

Hi! Today's card was inspired by many cards that I came across while searching on pinterest!  It is a very different type of card than my usual, it's a card in a box. They are super cute and fun to make.

My mom is my #1 fan, lol, so I like to surprise her with different styles of birthday cards each year. When I came across this one I knew I had to try it.  I used a DCWV paper pack to create the entire card. I chose a few sheet from the pack and fussy cut some flowers and a few other designs to use as embellishments. I used some acetate to hold the flowers up in the middle and tons of foam adhesive to really add dimension to this card.

So with all that said, here is the card:

Front

Left Side


Right Side

Back side

Supplies:
Paper: DCWV-The Black Currant Stack
Stamps: Stampin' Up-Well Scripted
Ink: Close to My Heart-Black

Thanks for stopping by!